Serato DJ Playlists
An awesome feature within Serato DJ that you may or may not be aware of is Serato Playlists.
Serato Playlists is a way for DJs to export their playlists from Serato Software and share them online through their Serato.com profile. Using Playlists is a great way to share your set lists and mixes with your fans!
The team here also go through these public playlists every couple of weeks, and pick a handful to feature on the front page of the playlists webpage.
If your mix is FIRE, you might just get featured.
(One of our servers went down recently meaning that Serato Playlists were not able to be exported to our site. We have fixed the issue and everything is back up and running smoothly)
Here's a step-by-step guide to get you started and sharing your playlists with the Serato DJ community on serato.com/playlists
How To Use Serato DJ Playlists
Exporting Your Serato History Online
Your Serato Software has a feature called History which logs every tune you play and organises these plays into sessions referenced by date. The History panel has an export function so you can easily export any History session as a .txt, .m3u or .CSV file. Additionally, the export function also has an option to export to "Serato Playlists".
Getting your playlists online has never been so simple
1. Click on the History session that you would like to export to Serato Playlists. Next, select "Serato Playlists" in the Format drop-down:

2. With the History session selected and the "Serato Playlists" Format option selected, click Export.
NOTE: Your computer will need to be connected to the internet in order to send the History session to Serato Playlists.
TIP: You can select and export multiple History sessions at the same time by selecting multiple History sessions before clicking the Export button.
3. Once your History session data has been transmitted, a web browser will open automatically and direct you to the next step in creating a Serato Playlist. At this stage, if you are not logged into Serato.com you will be asked to log in. Similarly, if you do not currently have a Serato.com user account will need to create one to proceed.
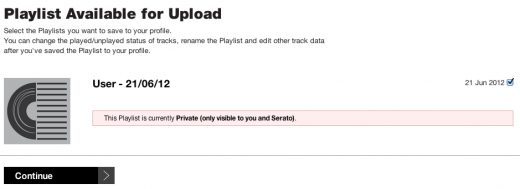
When you are successfully logged in to your serato.com user account you can verify which of the exported history sessions you wish to create Serato Playlists from. After making your selection click Continue.
Congratulations! Your History sessions are now Serato Playlists.
Editing Your Playlist And Sharing Online
Once you have created your Serato Playlist, you can now edit the Playlist visibility, genre tags, images, titles and gig or radio show information to get it ready to share with your fans.
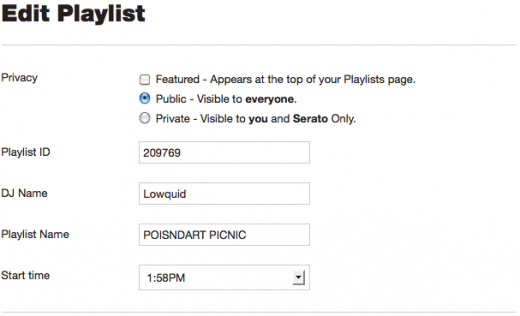
1. Click Edit Details to reveal the editing options for your playlist.
2. Add a Playlist name, select where you played it and fill in the location information. Note also that, by default, Playlists are private. This means that they are visible only to you. If wish to share your Playlist with others be sure to the Privacy setting to Public.
3. A list of potential Playlist genres will be generated from the genres tags in the tracks in your Playlist, so you should have a good list to choose from.
To tag your Playlist with a genre simply click on relevant genre(s) from the list of genres displayed as small text. Selected genres appear in grey boxes. Clicking the grey genre box will remove the genre tag from Playlist.
You can add additional genres by typing them into the Add new genre box and clicking the Add button.

4. Add an image to your Playlist - this could be a flyer, the radio station logo, a cute sea creature, anything really...
5. You can tweak the track information in your Playlist by clicking the Edit Tracks button. You can toggle which tracks were played in your Playlist and edit track and artist information. You can also use the Insert buttons to add tracks that were not logged to your History session (eg. tracks you played off CD or vinyl.)

You're now ready to share your Playlist with the world!
Adding audio to your Playlist
Adding audio to your Playlist is great for fans who are keen to hear your Playlist in action. This is a piece of cake with Mixcloud, a free online mix hosting service who we've worked closely with to provide Playlist integration:
1. Sign up to Mixcloud here.
2. Click Upload in the top navigation bar on Mixcloud and follow the instructions to upload. When you get to the section for inputting your playlist, you will see a selection that says Serato playlist. Click this option.
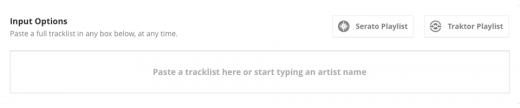
A bar will pop up for you to input the URL of your Serato Playlist. Simply copy and paste the URL of the corresponding Serato Playlist into the bar, and click Import and what do you know - there's your Playlist!

3. Continue the process and click "Save" once your mix has finished uploading. Mixcloud will use the time information from your Serato Playlist to help time stamp the tracks for you as well.
4. Grab the Mixcloud URL of your newly uploaded mix and head back to your Serato Playlist page. Click on Edit Details, paste the Mixcloud URL into the Listen Link box and click Save.

5. Now when people view your Playlist they'll see a Open Mixcloud Player button on your Playlist page. Clicking this button will launch the Mixcloud audio player in a pop-up window.
You now know all the technical business behind creating Serato Playlists. Head over to your serato.com profile and start promoting your sets online!