
Before recording a mix, it is important you figure out what you will want to do with the mix once it's finished. While it is often easiest to just press 'record' and have a play, the more familiar you are with the recording process the easier it will be to keep your mixes sounding dynamic and professional. While there are tools in which you can make a recording sound more punchy and vibrant, there is no way to increase the quality of poorly recorded audio.
The most common reasons for recording a mix are:
- Professional Mix CD release
- Web mix / podcast
- Promo / demo CD for promoters
- Friends & family
- To critique your own style: listening and learning helps your DJing to grow.
Each of these may require different levels of quality, and the further up the list you go the more polished the recording should be. Even if you are making the CD for yourself, it is always a good idea to aim to get the highest quality possible, sometimes a poorly recorded set can be ego crushing.
DIGITAL RECORDING
When you record audio into a digital environment you end up converting the 'real' analog audio signal into a series of digital information. The process of conversion has limitations and is worthwhile taking the time to understand the process.
Digital recording takes the analog signal and turns this into digital information using an A/D (analog-to-digital) converter. The process scans the incoming signal and turns the smooth analog signal into a series of digital O's and 1's.
Digital recordings uses both sample rates (Hz) and word size (bits). The higher the numbers of each, the higher the quality.
SOUND RESOLUTION
Sample Rate: Anything with a sample rate below 44.1 kHz can be heard of as having a lower quality, although anything above this is not easily recognized by the human ear unless you are using high quality sound systems.
Bit Rate: The jump from 16bits to 24bits can be dramatic. Professional audio engineers now use 24bits, and it is worth while recording at 24 bits if you wish to edit your recording later.
NOTE: If you are giving out compact discs they are only able to handle 16bits, so you will need to convert (or dither) down to 16bits.
RECORDING GAIN & AUDIO QUALITY
Keep the audio at the highest possible quality throughout the entire recording process. Sound editing is destructive in nature, so each step you take in this process will result in a loss of quality. Some steps can cause a distinct loss of quality (ie. converting from a WAV file to an MP3) and should only be done once in a file's life.
DJ equipment: Make sure all your equipment is in good working order before you start to record, there is nothing worse than getting halfway through a good mix and realizing that your needles are dusty or your mixer is crackling.
Leads and Cables: Make sure you are using good quality leads. This may mean using shielded RCA cables, or using new leads for the mix. We recommend keeping all leads away from power sources, other cables or speakers.
Recording volume / Gain Structure:
- Keep your signal as loud as possible, without at any point going redlining or clipping the signal over zero dB into your recording device or soundcard. Redlining your channels can result in distortion or digital clipping.
- Keep an eye on how loud your transitions are, adding two signals together can push the overall volume over into the red, even if each track's peak is under.
- Ensure that you have done a test recording so you know your setup is working without problems.
RECORDING YOUR MIX
There are various ways to record depending on the hardware and software you are using:
SCRATCH LIVE (SL 1, SL 2)
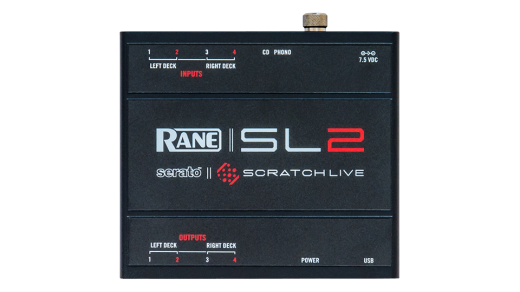
Because the SL 1 and SL 2 only have Left and Right inputs, you will need to use audio program to record as the audio is mixed and blended outside of the software (inside your DJ mixer).
There are several recording programs you can use such as Audacity (free) or Ableton Live (paid, for more advanced options).
You will need:
- SL 1 or SL2
- RCA cables
- USB cable
- computer with line input (unless you have an external soundcard you wish to use)
- Stereo RCA to 3.5mm mini jack cable
To record:
- Setup your SL 1 or SL 2 like you would normally and launch Scratch Live.
- Connect the Stereo RCA to 3.5mm mini jack cable from an additional output from your DJ mixer (i.e. booth, record, 2nd master) into the line input of your computer (or your external soundcard)
- Set the record source in your recording program to "line".
- Check the record settings/preferences are set to stereo 44.1 kHz and 16bits (more if you desire).
- Test there is audio coming into the recording program and check the levels aren't going above zero dB on the recording channel.
- When you are ready, press record in your recording software, and start your mix.
- When you are finished, make sure you stop the recording, and save the mix to a location of your choice.
NOTE: Because of the extra strain on your laptop's RAM and CPU while running Scratch Live and a recording program, we recommend that you use a desktop or a separate laptop to record a mix if you are able to.
SCRATCH LIVE (SL 3, SL 4)
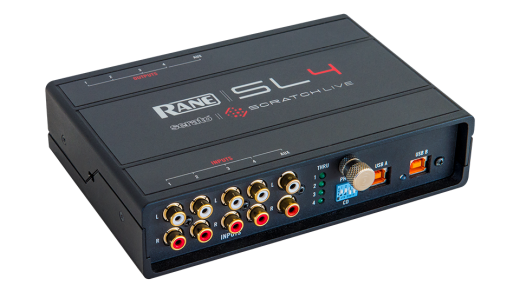
With the SL 3 or SL 4 you can use the AUX input to record your set and record using Scratch Live. Set up Scratch Live normally with your DJ setup and laptop.
NOTE: Make sure to set the AUX channels dip switch on the hardware to line level when recording.
What you will need:
- SL 3 or SL 4
- RCA cables (plus any other cables you need for your normal DJ setup)
- USB cable
- laptop
To record:
- Setup your DJ equipment like you would normally and launch Scratch Live.
- Connect the RCA cable from an additional output from your DJ mixer (i.e. 'booth' or 'record' or '2nd master') into the AUX input of your SL 3 or SL 4.
- Open the Record tab in Scratch Live.
- Set the record input source in Scratch Live to "aux".
- Test that your record levels aren't clipping (you can use the Gain knob to adjust this level).
- When you are ready, press the red Record icon in Scratch Live, and start your mix.
- When you are finished, type a file name (i.e."mixtape 1") into the Filename box and press the Save icon. Remember to enter a filename, otherwise your recording will be lost if you press 'Record' again before saving.
Recordings are saved in:
- “MyDocuments\My- Music\_Serato_\Recording” (on a PC)
- "~/Music/_Serato_/Recording” (on a Mac)
- "In your 'Recorded' crate in Scratch Live crates"
NOTE: Recording files are automatically split when the recording exceeds 3 hours (16-bit) or 1 hour 50 minutes (24-bit). Recordings are saved as 24-bit by default.
SCRATCH LIVE (TTM 57SL, SIXTY-ONE, SIXTY-TWO, SIXTY-EIGHT)
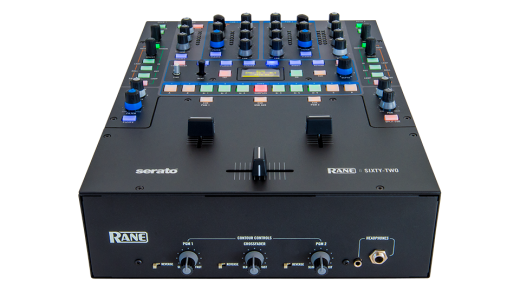
Recording your mix using the Rane Sixty-Eight & TTM 57SL is easy, as the audio signal form the mixer is returned via the USB cable back into Scratch Live.
To record:
- Setup your DJ equipment like you would normally and launch Scratch Live.
- Open the Record tab in Scratch Live.
- Set the record source in Scratch Live to "mix".
- Test that your record levels aren't clipping (you can use the Gain knob to adjust this level).
- When you are ready, press the Record icon in Scratch Live, and start your mix.
- When you are finished, type a file name (i.e."mixtape 1") into the Filename box and press the Save icon. Remember to enter a filename, otherwise your recording will be lost if you press 'Record' again before saving.
- Recordings are saved in:
- “MyDocuments\My- Music\_Serato_\Recording” (on a PC)
- "~/Music/_Serato_/Recording” (on a Mac)
- "In your 'Recorded' crate in Scratch Live crates"
NOTE: Recording files are automatically split when the recording exceeds 3 hours (16-bit) or 1 hour 50 minutes (24-bit). Recordings are saved as 24-bit by default.
SERATO DJ / ITCH
Recording your mix within Serato DJ or ITCH is easy, as the audio can be taken directly from the software.
To record:
- Setup your controller like you would normally and launch Serato DJ / ITCH.
- Open the Record tab in Serato DJ / ITCH.
- Set the record source in Serato DJ / ITCH to "mix".
- Test that your record levels aren't clipping (you can use the Gain knob to adjust this level).
- When you are ready, press the Record icon in Serato DJ / ITCH, and start your mix.
- When you are finished, type a file name (i.e."mixtape 1") into the Filename box and press the Save icon. Remember to enter a filename, otherwise your recording will be lost if you press 'Record' again before saving.
- Recordings are saved in:
- “MyDocuments\My- Music\_Serato_\Recording” (on a PC)
- "~/Music/_Serato_/Recording” (on a Mac)
- "In your 'Recorded' crate in Serato DJ / ITCH crates"
NOTE: Recording files are automatically split when the recording exceeds 3 hours (16-bit) or 1 hour 50 minutes (24-bit). Recordings are saved as 24-bit by default.
In this day and age your mix can be a good way to help get you gigs, create fans, promote your DJ profile, or increase your skills or just enjoy a blend of your favorite tracks.
Once you are happy with recording the mix you may wish to master your recordings to make it sound professional. You can also check out our guide for sharing your sets.
If you are still having trouble with recording please start a new help request here.