One of the benefits of using Serato DJ software and owning a Serato DJ license is that it gives you the ability to record on many different pieces of hardware. It’s super simple to do and is a great way to listen to your sets, share them with friends or record your precious vinyl collection into your digital music library.
In this article we’re going to cover the ways to record on these different hardware pieces and the best practices to get your mixes sounding right.
Most of the time it's as simple as pressing...
Different hardware:
Most devices that you use with Serato DJ will let you record the “Master Mix” with the exception of the Rane SL2 and Denon DS-1*. All other mixers and interfaces do allow you to record your master mix.
*The reason these two devices can’t record a “Master Mix” is because they simply don’t have the inputs available and don’t sum the audio together (the audio is summed the mixer you plug into).
How To Record:
First, open your REC panel at the top of Serato DJ -
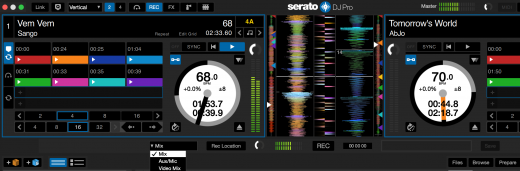
Then in the drop down menu, make sure you are choosing the Mix option to record all the audio coming from your mixer, controller or interface. *If using the SL3, SL4 you’ll want to nominate the AUX option and route the output of the mixer into this input on the box using spare RCA cables.
Once you’re ready to record, check to make sure your levels are coming in at a good level on the VU meter (allow for some headroom so you don’t distort. It’s easier to turn something up, than to remove distortion)
Green = good
Yellow = best
Red = bad

Rec Location
You can choose where you’d like the recording to be saved to in REC Location. I suggest the desktop or dropbox destination rather than the default _Serato_ > Recorded location because it allows quick access to the raw recording.
*You can also set the location to an external drive too if you are short on internal drive space.
Saving your recording
When you are finished your recording MAKE SURE YOU SAVE YOUR RECORDING. If you forget to do this it will be temporarily saved in the USER>Music>_Serato_>Recorded Temp folder but, will be erased as soon as you press REC again.


Mastering your mix
Once you are happy with the recording, you may want to use a 3rd party DAW like Ableton or Garageband to edit your mix and apply a master limiter or compressor to even out the volume. This will help make your mix levels smooth overall and help tighten up the sound.
There are lots of good plugins in the DAWs that will allow you to do this. (You can also get some pretty great mastering plugins like iZotope Ozone). It’s also a great opportunity to add any drops or transition effects you might like to spice up your mix (if you didn’t already make use of the Sampler in Serato DJ).

Recording Vinyl
In addition to recording mixes, use the recording function as a quick way to import vinyl records or other audio into the computer. You just need to record the phono input (most turntables) or Line input (if your turntable has an in built pre amp) on a channel or the “Main mix". You can record a bunch of records all at once and edit them down to individual tracks at a later point too.
Recording Video
If you use Serato Video, and have a controller or mixer that is fully mapped to Serato Video you can also record video too! Recording video is very CPU intensive and is best used following this guide here.
In short, it’s best to record to a different drive than the one that the Video files are coming from. For example If your video files are stored on your internal drive, use the Rec Location to record to an External drive or vice versa if your files are stored on your external Drive.

Creating your own Visuals
I like to use the Media Crate and create my own visuals for remixes or songs I’ve made to use in VJ sets or to upload to Youtube or Vimeo. There are many creative ways to utilize the REC feature. I hope this helps and inspires you to take advantage of one of the many benefits of using Serato DJ.