
The History Panel is often a feature in Serato DJ that is less explored. In this article, we'll give you a quick overview of three functions of the history panel and how it can add value to your DJ life.
Exporting Playlists
If you're frequent user of the Serato website and your Serato account you'd know that there is a great Serato online community. If you're not aware, the Serato website is a great way for you to interact with the team here at Serato HQ via our online forum, keep up to date with the latest announcements via our blog feed and sharing your playlists from your Serato software via the playlists page.
To export a playlist directly to your online Serato account:
1. Open the History panel in either online or offline mode
2. Scroll through your History and locate the exact date of your session you'd like to export and convert into a Serato Playlist. Once you've located your exact session, its now time to export. Click and highlight the session name, which will be the 'date' of the session by the default:
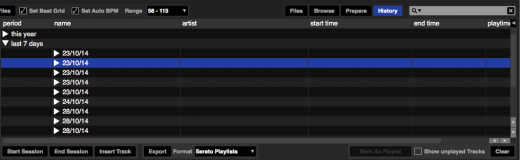
3. From here, select 'Serato Playlists' in the 'Format' drop down and then select Export, to which you'll see a status appear. Please note in order to successfully export to your Serato account, you will need to be connected to the internet.

4. Once the exporting is complete, your exported playlist will now appear in your internet browser window. From here, you can then view your now playlist, make changes and then share it with the rest of the Serato community.
Converting Sessions into Crates
Every played a killer set that you wouldn't mind using again sometime in the future? A great way to archive this is turning these sessions into crates for easy access. To do this:
1. Open the History panel in either online or offline mode
2. Scroll through your History and locate the exact date of your session you'd like convert into a crate.
3. Once you've located your exact session, Click and highlight the session name. From here, simply Click & Drag this session to the Crates button:
Clearing Played Tracks
Clearing your played tracks to the from the played 'Blue' to its default is a great habit to get into, especially if you're constantly playing back to back gigs. Doing this just before your gig is best. To Clear played tracks and set them back to default:
1. Open the History panel in either online or offline mode
2. In the bottom right hand corner select the 'Clear'
