For those making the move up to Serato DJ from Scratch Live, there's a few differences to the SP-6 Sample Player to be aware of. Check out this short guide and get your bearings!
Overall, the features are the same but the new SP-6 Sample Player has been streamlined for performance. If you are unfamiliar with the basic functions of the SP-6, check out the Serato DJ manual
Getting Started
When you first open the software, your sample slots will be empty and you will have to reload your samples. You will also have to create a new midi mapping if you are using a controller. This is because Scratch Live and Serato DJ don't store this information the same way.
Just locate the samples you use and drag them to the desired slot. Once you set this up, your samples will be saved on exit and re-load when you re-open the software, just like Scratch Live :)
Differences
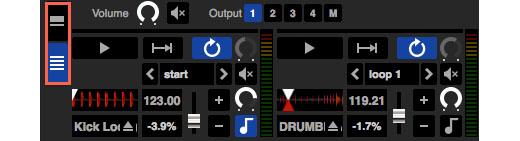
The SP-6 button is now located at the top left of the screen above the left Virtual Deck -

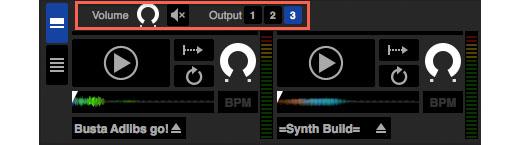
The output options and SP6 volume have moved to the left
There are two view modes located on the left (as opposed to the drop down menu in SSL) called Simple and Advanced.
The different "Sample Play Modes" are now able to be selected by clicking on the Playback mode until you select the desired option for your sample.

You now have the option to set the gain and the output volume.

If you have samples that have BPM information that will now be displayed here.

You can adjust the pitch, nudge up or down and turn on keylock here.

All the above features are able to be MIDI mapped as in Scratch Live.
In Serato DJ, the SP-6 Sample Player does not output to both channels at once (M option in Scratch Live). You'll want to choose the output you want your SP-6 audio routed.
Here's what we recommend:
Rane SL 2: You will want to choose which channel you want to nominate to send the SP6 to output to, or swap between them.
Rane SL 3: Routing to the AUX output is the best option as you can then send it to an available channel on your hardware mixer.
Rane SL 4: Route output to the AUX output which you can then connect to a spare channel on your mixer or even an auxiliary input if your mixer supports that.
Rane Sixty-One: Route output to the AUX Same as SL3 (This will allow you to utilise the Software FX/Flex Fx on the hardware)
Rane Sixty-Two: Route output to the AUX Same as SL3 (you will now be able to use the dedicated HP/LP combo filter and apply the hardware FX, using the Flex FX)
Rane Sixty-Four: Choose one of the four channels to output the SP6 to (you will be able to use the hardware FX too)
Rane Sixty-Eight: Choose one of the four channels to output the SP6 to (you will be able to use the hardware FX too)
Pioneer DJM-900SRT: Choose one of the four channels to output the SP6 to (you will be able to use the hardware FX too)
We hope you enjoy the new streamlined design and many more features and functions to come. If you have any questions or feedback, hit us up in the comments. If you have any issues or would like technical support, please start a help request.
Cheers!
Matt P.